The Katana is probably the most widely known when talking about swords. Warriors wielded this knife for generations, and Japanese history has kept its legend alive. However, the knowledge of how to sharpen a Katana does not come by easily.
Today, the Katana is a treasured collector’s item, and each true Katana comes with a deep and fascinating history. Rare and exquisite Katanas can cost tens of thousands of dollars and represent a significant and vital part of Japanese history. With this impeccable value comes the need for impeccable blade care.
Katanas are some of the most technically challenging knives to sharpen. Their creation can take several months in some cases and require thousands of hours of work. It’s this attention to detail and specific requirements that make Katanas so tough to sharpen.
We’re going to look at the sharpening process and show you what it takes to put a razor-sharp edge on these masterpieces. If you’re a beginner, you’ll find out where you need to build up your skill (we don’t recommend you try to sharpen a Katana unless you have significant experience and confidence).
If you’re a pro, this guide will help you refresh your memory if you haven’t tackled sharpening a Katana before. We’ll also point out what’s unique about this process, show you the materials you need, and give you some technical tips along the way. With all this in mind, let’s jump into the guide!
What Makes Katanas Difficult to Sharpen?
Katanas are revered for how difficult they are to sharpen. Any mistakes you make – with any of the stones – can be irreversible. These are extremely valuable and finely crafted blades, which is why any old whetstone isn’t going to cut it. The first challenge you’ll run into is the curved blade.
Curved blades are challenging to sharpen as they are, but then you add in the high-quality steel and the need to reset the blade’s curve as you sharpen it – and you’ve got a hard day ahead of you. The second challenge is matching the Katanas X-shaped grind.
Most knives have a diagonal grind pattern that’s easy to match, but Katanas have to be sharpening from opposite angles to get to the sharpest possible edge. Combine this with the fact that messing up and over-sharpening with any of the whetstones can completely ruin your Katanas cutting edge.
We’re not telling you this to trip you up or scare you away – but rather to prepare you. Katanas need to be treated to the highest possible standards and with the utmost care. You’ll need to buy premium Japanese sharpening stones that are made for sharpening Katanas. You’ll also need to make sure your technique is flawless and that you’re confident in your skills.
What Materials Do You Need to Sharpen a Katana?
Getting the tools for sharpening a Katana isn’t cheap. You’ll need to buy specially made synthetic whetstones (Japanese sharpening stones) at several different grits. These stones can be rather expensive, far more so than your standard whetstones. Whetstones that can be used for sharpening a Katana need to be highly granulated and refined.
Even the smallest imperfection can nick or damage the cutting edge and set you back several hours. If you’ve just got a standard mall-grade Katana, you don’t need to break the bank buying these Japanese whetstones (which can cost over $1000 per stone). You should only get these premium stones if you’ve got a genuine Katana and want to take the best possible care of it. Here are some of the other materials you’ll need:
- Container with clean water
- Cloth for wiping the blade
- Spray bottle for keeping the stone wet
- Work desk set to a comfortable height
- Vice or towel to hold the stone in place
- Some cloth to grip the blade with
- Hammer and wooden peg (<1cm thick) to remove the Katanas handle
- Box to keep handle pegs and parts
- Paper or foam for a cutting test
Once you’ve got all these materials gathered, and you’re ready to get to work, move on sharpening your Katana.
How to Sharpen a Katana – The Steps to Follow

These steps will cover everything you need to do to sharpen your Katana. We’re going to give you practical pointers and tips along the way – so stick with us to the end. If you’re a beginner, use these tips and steps to fill in the blanks and to check which areas of your skillset are lacking.
Work your way through these steps slow and steady. Going too fast can ruin your Katanas cutting edge and can even damage your sharpening stones. Let’s get started!
Step 1: Get Set Up Right
Make sure the sharpening stone is fixed in place. It needs to be sitting flat on the surface it’s on and should not move at all when sharpening. You should put a towel under the stone if you don’t have a vice or some way to hold it in place. Keep your container of water (for soaking) and the spray bottle nearby, and keep the cloths for wiping handy.
Work at a comfortable height and with good lighting. If you’re Working higher or lower than you should, you’ll strain your neck, hands, and shoulders, and you’ll run the risk of altering your sharpening angle. You also need to make sure you have all the sharpening stone grits you need to complete the job.
We like to start at a 1000-grit, moving up to higher grits for the polished finish. Using the 10,000-grit stone is optional but will put the sharpest edge on your Katana.
Step 2: Soak the Stones and Remove the Handle
This will take a couple of minutes and won’t need your constant attention. Place all of your sharpening stones in the container of clean water. You’ll notice quite a lot of bubbles escaping from the stone – this is normal and should be expected. The stones are ready when there aren’t bubbles streaming out of them.
Take them out and place them in the vice/on the towel for use. Removing the handle is quite simple. All you need is the wooden peg we spoke of earlier and a hammer/wood mallet. You’ll notice diamond-shapes all along with the handle. Inside 2 or 3 of these shapes, there will be a cylindrical peg hole that houses a wooden peg (which holds the blade to the handle).
You need to find these 2-3 peg holes and push the pegs out lightly with the hammer and small wooden piece. Pull the peg out with your hands or with some pliers as it emerges out the other side.
Step 3: Good Sharpening Technique and Tips
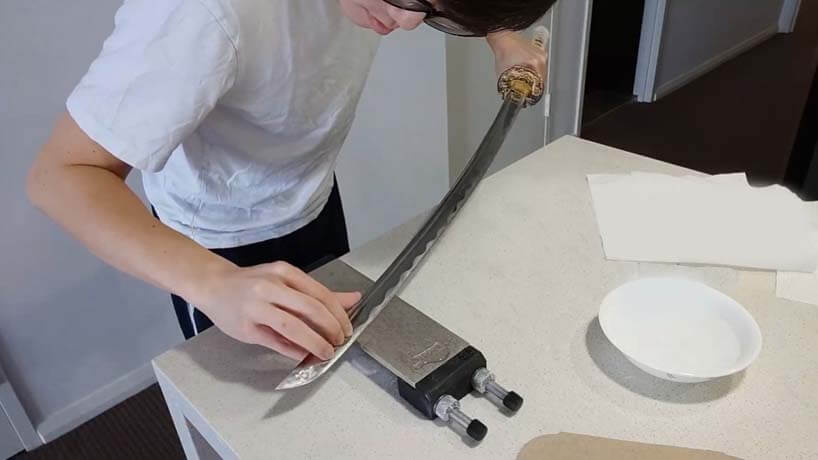
The first thing to do is to clean the blade. Wipe it down with a clean microfiber cloth and inspect it to make sure all residue and particles are gone. Even small pieces of dirt can cause tiny freckles and chips on the cutting edge – especially when you’re working with finer-grit stones. Place the Katana at near-perpendicular with the sharpening stone.
The sharpening stone should be pointing straight ahead and center-body. Place the Katana so that the blade is facing away from you as we’re going to sharpen it into the cutting edge. Here is the stroke technique you should use to sharpen your Katana:
- Lay the Katana flat on its side, starting as close to the tang as possible
- Raise the spine off only slightly to find the right sharpening angle
- Place one hand on the tang (wrapped in a cloth) and one hand of the blade’s spine for added stability
- As you push the blade into the stone, drag it diagonally so that you contact as much of the cutting edge as possible in a single stroke
- Reset the blade and repeat
Once you’ve done this, you’ll need to repeat the same process – but starting from the other end of the blade (tip-side). This time you’ll lay the blade flat on its side but starting on the tip-end of the blade. Repeat the same technique and stroke number as the above section. This will put the X-shaped grind on the cutting edge.
Step 4: Use Finer Grit Stones
Around 75% of your time will be spent on the lower-number grit stones. Be careful not to over sharpen the blade as this can’t be undone. Work in small phases of 10-15 stokes from each end of the blade, then test the cutting performance on a piece of paper.
Make sure to get an even finish with each stone before moving to the next. Once you’re done with the 8000-grit stone, you can stop if you’re happy with the results. Don’t forget to sharpen the section near the tip of the blade at each step – it can’t be ignored.
Step 5: Cutting Test
The cutting test can be done with paper or with something tougher like pool noodles, bamboo, etc. Paper does it for most tests, but make sure you test all parts of the cutting edge to test for an even finish.
Final Thoughts
You have everything you need to start working on your Katana sharpening skills. All that’s left is for you to get some practice. Take your time, and don’t rush any of the steps. Sharpening a Katana is an art, and attention to detail is essential. Good luck and enjoy the process!


